
Favorite Sourdough Bread – 70% Hydration Recipe
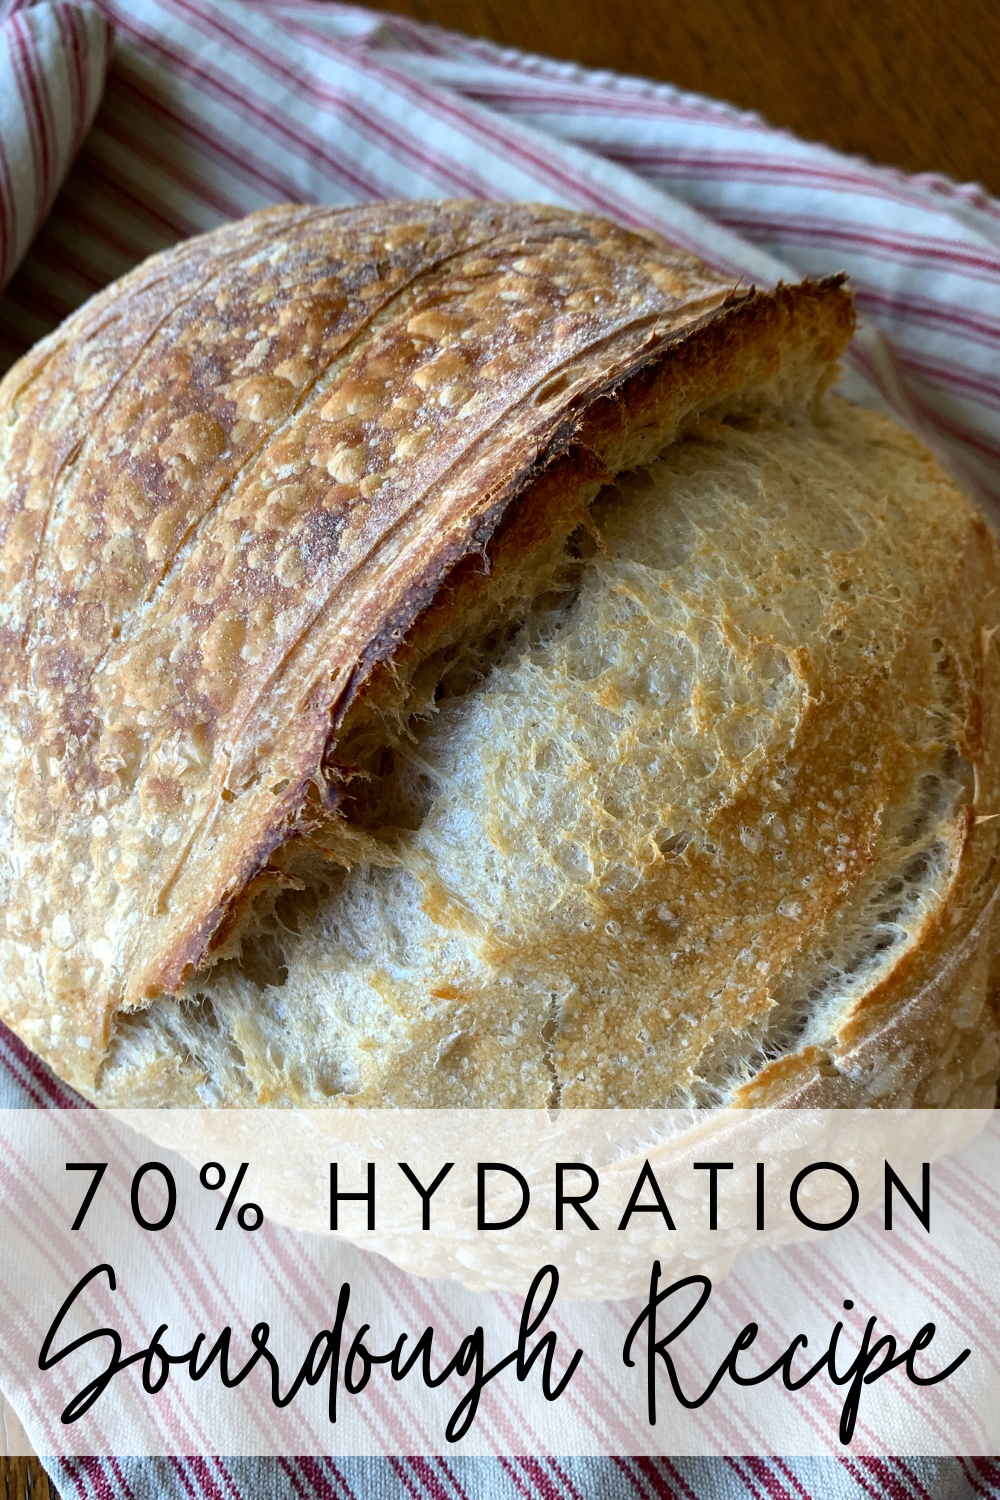
My go-to sourdough bread recipe for a simple, classic sourdough boule. Crusty on the outside, soft and moist on the inside, with a crumb that is just right!
Sourdough bread is a staple in our kitchen. Perfect for toast, sandwiches and everything in between! Once you make the switch to homemade sourdough, you’ll never want to go back to store bought bread. In fact, I first made my starter almost two years ago now, and we haven’t bought bread at the store since!
There is a bit of a learning curve when it comes to sourdough, but once you get the hang of it, it’s actually quite simple. Yes, it does take some time…but the majority of that time you aren’t actually working with the bread. Really, making the bread only takes a few minutes here and there; most of the time involved with a sourdough recipe is just letting it sit and do it’s thing.
Like I said, I’ve been making sourdough bread for almost two years now, which isn’t really that long in the sourdough world (some starters are decades, or even centuries, old!). However, I have learned quite a bit in that time. I’ve tried out several recipes and techniques, and have gotten into a groove of what I like (although there’s always more to try – another great thing about sourdough; the possibilities are endless!).

What I Love About This Sourdough Bread Recipe
Through a lot of testing, techniques, and trial and error, this has been my go-to recipe for a while now. Here’s what I love about this recipe.
No fancy equipment required. If you do a deep dive into the sourdough world, it can get really technical. While I’m all for some good technique, I don’t believe you need a lot of fancy or super-specific equipment to get started. All you really need is a large mixing bowl, a kitchen scale, and a Dutch oven. Sure, there are some other gadgets that can help make your life a little easier, but those three things are all you need to get started.
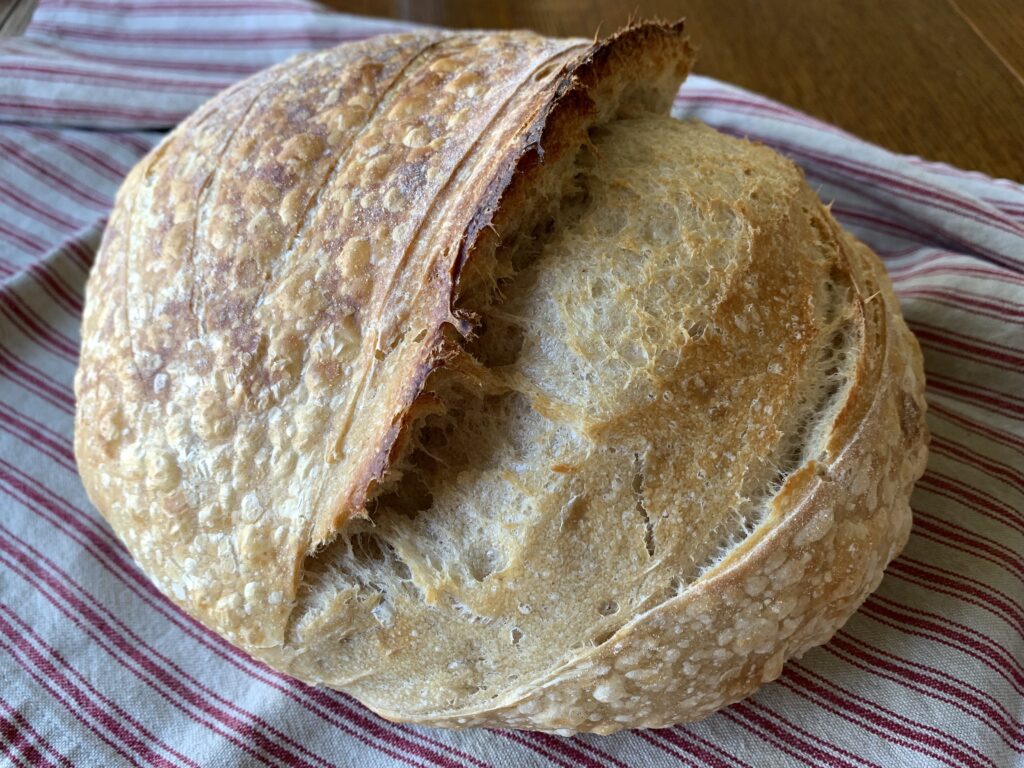
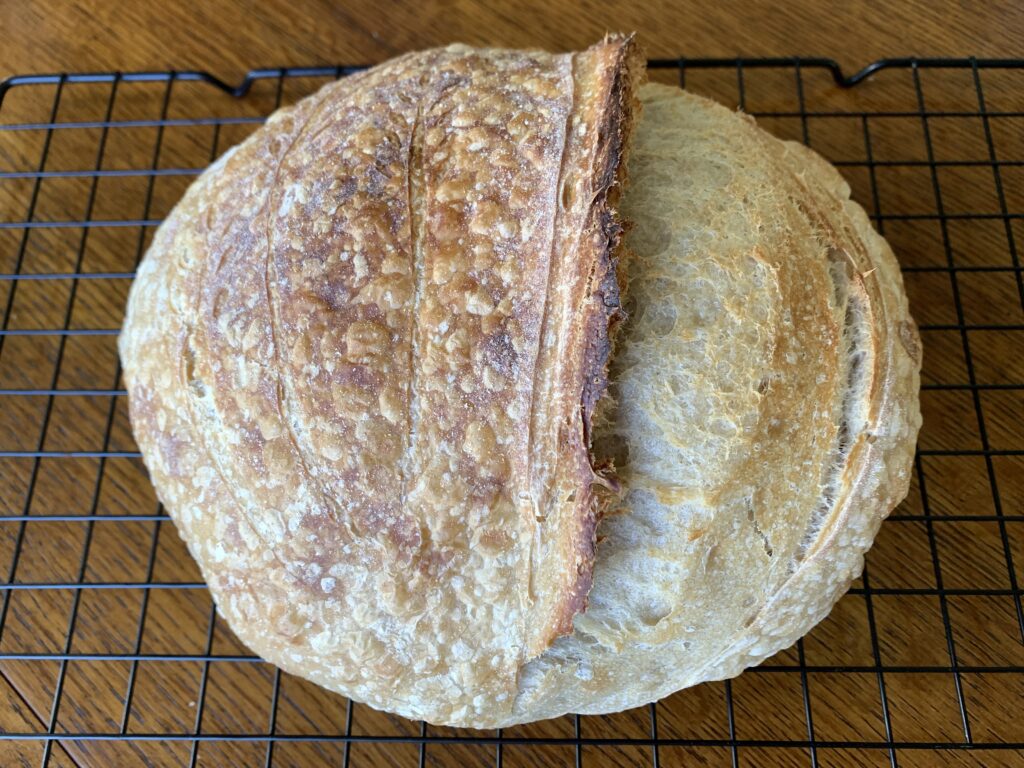
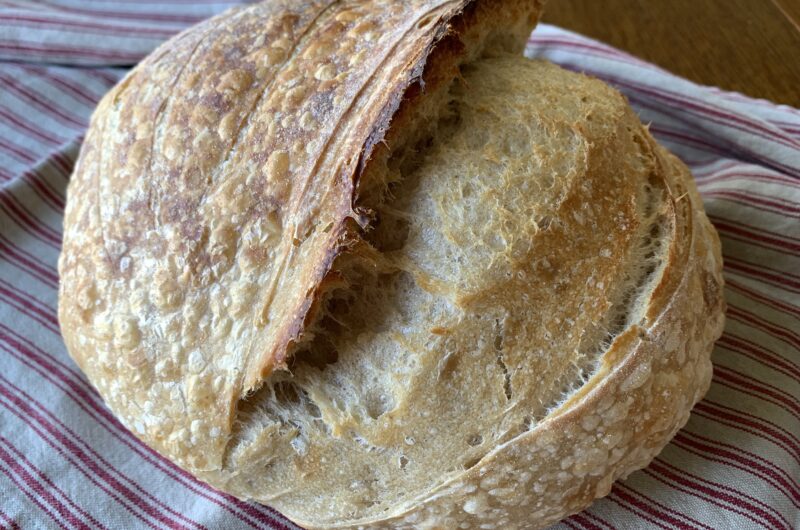
Flavor and texture. This recipe calls for just a little bit of whole wheat flour, which adds some depth of flavor but is not too drying. The outside is crusty and golden just like it should be, but the inside is soft and moist. While an open crumb will have large holes that might not be the best for sandwiches, and a closed crumb might have a more gummy texture, I’ve found that this 70% hydration recipe creates just the right crumb.
Super simple! This is a super simple no-knead recipe, meaning that the gluten is developed gently over time with some folding techniques. I much prefer this method over a kneading recipe, and have found that the gluten develops much better with folding rather than kneading.
Tips for Making Your Best Sourdough
Strong Starter. I can’t stress this enough. The success of your bread is largely dependent on the strength of your starter. I prefer to make a separate leaven whenever I’m making bread, but you can use an active starter as well. Either way, when you’re ready to mix your dough, your starter/leaven should be very bubbly, thick and puffy at the top (aka at its peak).
Use a high protein bread flour. Sure, all purpose flour will work in a pinch, but a nice high protein bread flour will help you get that beautiful rise you’re looking for. The amount of protein (aka gluten) in the flour largely affects gluten development and overall structure of the dough. I like to use an unbleached organic bread flour with a protein content of 11-13%.
Don’t overwork the dough. I know it feels like the more you work your dough the better, but there is a fine line between working it enough to get optimal gluten development and working it too much. Aim for 4 folds for every round of folding. When you get to shaping, I’ve found that less is sometimes more (unless your dough lacks structure – then more shaping to build up the structure might be better).
Have fun with it! Don’t get too caught up stressing about perfecting your sourdough. Even if your boule doesn’t turn out pretty, I bet it will still be delicious! I’m a firm believer that the roots of sourdough bread are that of wholesome, imperfect, nutrient dense food to feed families. I highly doubt our great great grandmothers were taking dough temps or worrying about the perfect ear or the most open, gorgeous crumb. While that can be beautiful and fun too, it doesn’t have to be the primary focus of your sourdough ventures. Some of my best loaves come when I’m not even trying!
This post contains affiliate links. As an Amazon Associate I earn from qualifying purchases.
Tools for Making Sourdough Bread
While you don’t need a lot to get started with sourdough bread, these are the tools I recommend.
Large mixing bowl & spoon
Banneton basket – if you don’t have one, a bowl lined with a clean kitchen towel will also work
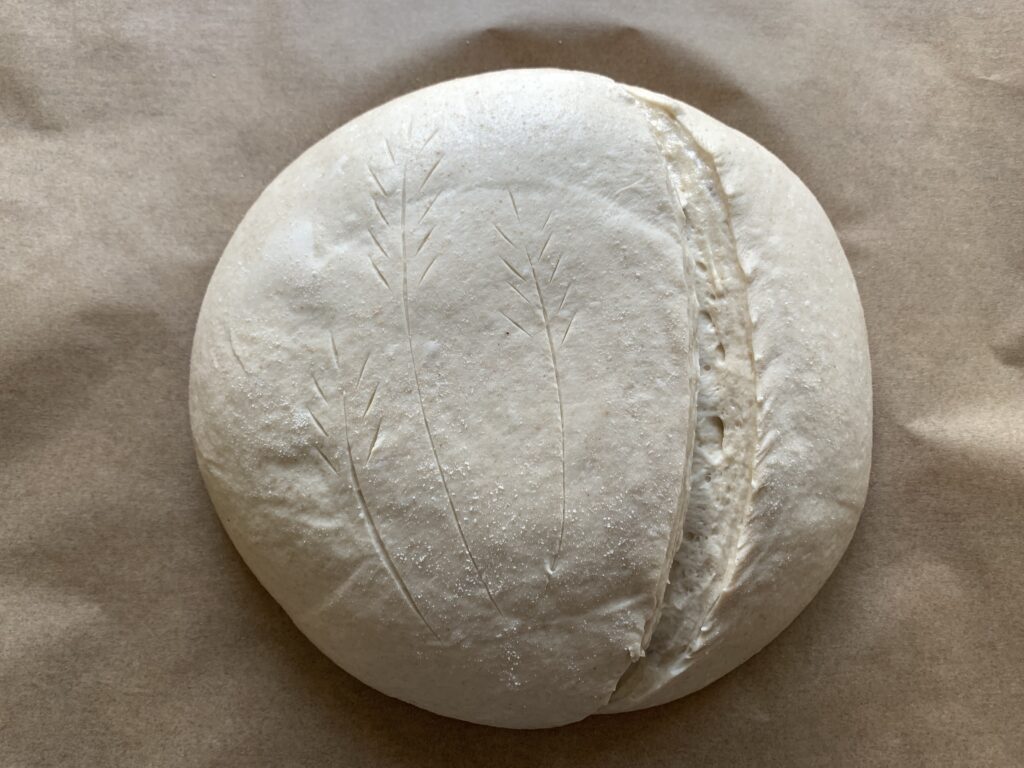
Lame for scoring – I do recommend a lame for scoring, as kitchen knives generally aren’t sharp enough to make a clean cut.
Ingredients
Leaven or active starter – I highly recommend using a separate leaven, but you can use a very active starter as well.
Water – room temp, filtered water.
Bread flour – you want a flour with protein content between 11 and 13%. I use King Arthur Organic Bread Flour, which has a protein content of around 12.7%.
Whole wheat flour – organic whenever possible.
Salt – my favorite salt is Redmond’s Real Salt
Method
The night before you want to mix the dough, make your leaven. Cover with a towel and place in a warm spot, like the top of your refrigerator. Your leaven is ready when it’s bubbly, puffed up and doubled in size.

Measure water in a large bowl, then whisk in leaven. Add flour; mix until a shaggy dough forms. Cover and let rest 20-30 minutes (autolyse).
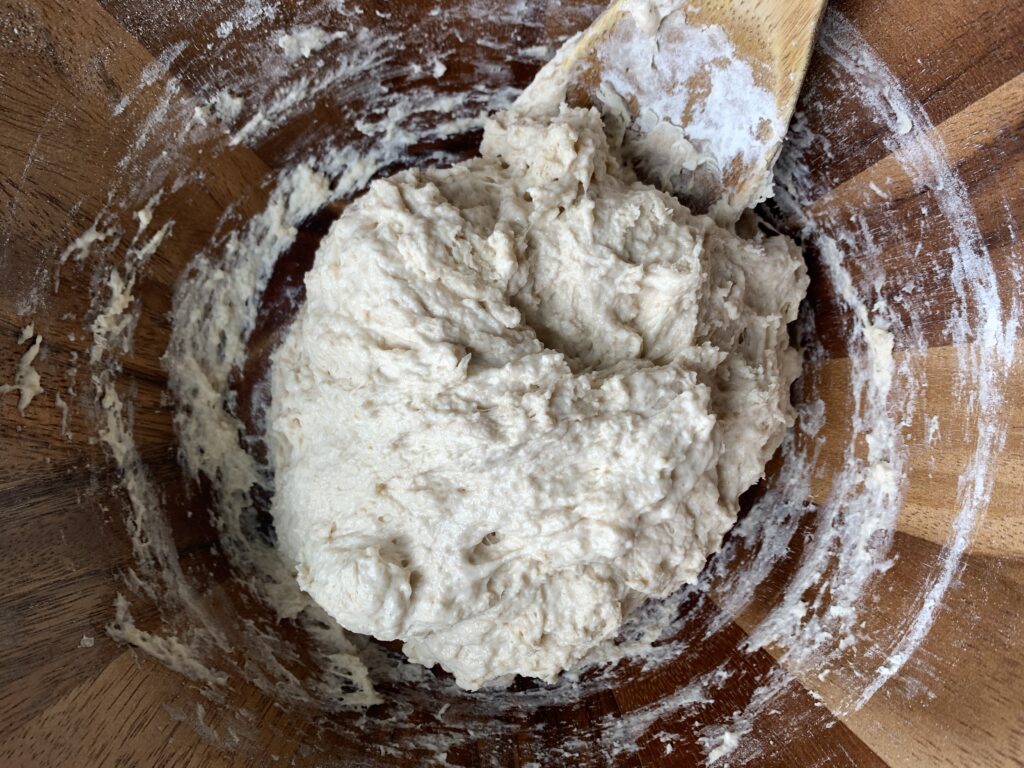
Add salt and about a tablespoon of water – the water helps the salt mix in well. Using a wet hand, work the dough until the salt is fully incorporated. Watch how the dough transforms from a shaggy mass to a smooth dough!
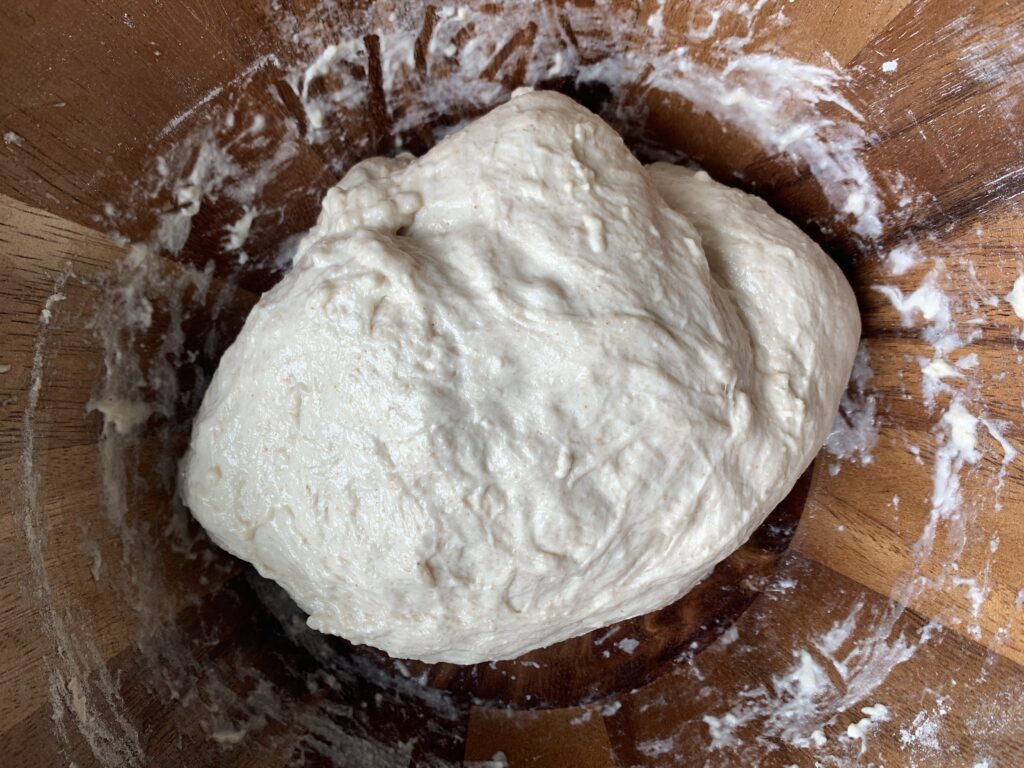
Cover for another 30 minutes, then start your rounds of folding. Cover the dough in between folds so it does not form a crust. Perform the first two rounds of stretch and folds every 30 minutes. Then, perform two rounds of coil folds every 45 minutes to an hour.
A “round” of folding is usually four folds, working your way around the round of dough with each fold. So if you think of your round of dough as a clock, you should be performing a fold at the 12, 3, 6 and 9 points of your dough.
Cover the dough and place in a warm spot (like the top of your refrigerator) until risen. It won’t be quite doubled, but about 1.5 times original size. This usually takes anywhere from a couple hours to several hours, depending on the temperature of your kitchen. If you’re having trouble gauging this, check out the Aliquot Jar Method.
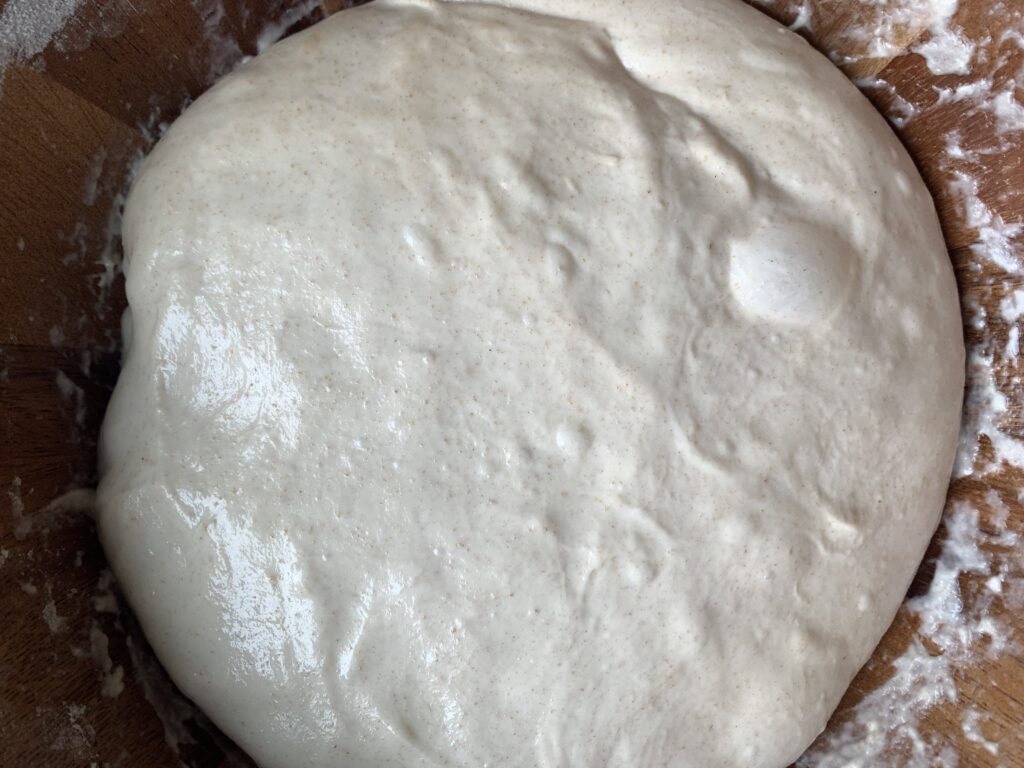
Once your dough has risen, it is now time to shape. Turn the dough out onto a clean surface. I don’t bother to flour the surface anymore – I’ve found that this dough is the perfect consistency that I don’t need to. But if you are new to working with the dough, it might be easier to lightly flour your surface.
Pre-shape the dough and let rest about 20 minutes. Then, final shape and place in your banneton basket. Cover and refrigerate up to 24 hours.
When ready to bake, preheat the Dutch oven in your oven at 450 degrees Fahrenheit. I like to give it an extra 15-3o minutes after the oven has preheated to make sure the Dutch oven is fully heated.
Turn your dough out onto parchment paper, score, and bake at 450 degrees with the lid on for 25-28 minutes. Turn the oven down to 425, remove the lid and bake another 10 minutes or until browned to your liking.
Example Timeline for Sourdough Bread – 70% Hydration Recipe
Here is my usual schedule for making this bread.
10pm: mix your leaven using an active starter (to have an active starter, you should feed it that morning).
Next day, 8am: Mix the leaven, flour and water; autolyse.
8:30am: Add salt; mix.
9am: First round – stretch and folds.
9:30am: Second round – stretch and folds.
10:15am: Third round – coil folds.
11am: Fourth round – coil folds, then bulk ferment.
4pm: Pre-shape the dough.
4:30pm: Final shape and refrigerate (cold ferment).
Next day, 8am: Preheat and bake.
You can definitely squeeze this into one day by only refrigerating an hour or two before baking, but I prefer a longer cold ferment for the more developed sourdough flavor.
However, sourdough is a very flexible process, so I encourage you to experiment and find what works best for your schedule!
FAQ
What’s the difference between a starter and a leaven?
A leaven is really just a separate jar of starter, made specifically for the bread you are about to make. I prefer to make a separate leaven for several reasons. First, it’s a more precise measurement of how much you will use, so you’re not using all your starter on one recipe. Second, since you are feeding a small portion of starter a large portion of flour and water, it will make a strong leaven. As a general rule, the more “food” (aka flour and water) that the starter has to “eat”, the stronger and more active it will be. I like to stick to a ratio of 50/50/10. That is, 50 grams water + 50 grams flour + 10 grams starter. Make sure to use an active starter to make your leaven. Curious on how I feed my starter? See this post.
How do you calculate hydration in a sourdough recipe?
Hydration refers to the percentage of water to flour. This recipe calls for 350 grams of water and 500 total grams of flour, so that is:
350 grams / 500 grams x 100 = 70% hydration
What if my timing is off?
Don’t stress about timelines with sourdough! The timelines provided in this post are merely to give you an idea of the process – they are not strict whatsoever. Honestly, I’ve made this recipe so much that I hardly look at the clock anymore. I just go by feel, and it turns out delicious every time.
Why not use a stand mixer?
While you can use a stand mixer fitted with a paddle attachment for the initial mixing of this dough, I’ve found that it’s usually more trouble than it’s worth. Personally, I don’t mind mixing the dough by hand. I’ve also found that the folding methods develop the dough so much better than using the stand mixer to knead the dough.
Favorite Sourdough Bread – 70% Hydration Recipe
30
minutes37
minutes24
minutesMy go-to sourdough bread recipe for a simple, classic sourdough boule. Crusty on the outside, soft and moist on the inside, with a crumb that is just right!
Ingredients
350 grams water, room temp
100 grams active leaven
50 grams whole wheat flour
450 grams bread flour
Directions
- Measure water in a large bowl, then whisk in leaven. Add flour; mix until a shaggy dough forms. Cover and let rest 20-30 minutes (autolyse).
- Add salt and 1 Tbsp water. Mix with your hands until salt is fully combined and the dough starts to come together. Cover and let rest another 30 minutes.
- Perform 4 rounds of folding as follows: first two rounds of stretch and folds every 30 minutes, then another two rounds of coil folds every 45 minutes to 1 hour. Cover the dough and let bulk ferment in a warm place until risen. This is usually about 4-6 hours, but depends on the temperature of your kitchen.
- Turn the dough out onto a clean surface and pre-shape. Let rest 20 minutes, then final shape. Place in a banneton basket, cover and refrigerate up to 24 hours.
- Preheat Dutch oven in the oven at 450 degrees Fahrenheit. Turn dough out onto parchment, score, and place in Dutch oven. Bake at 450 with the lid on for 25-28 minutes. Turn the oven down to 425, remove the lid and bake another 10 minutes or until browned to your liking.
Notes
- You can make this a same-day bake by only refrigerating an hour or two before baking.
- You can sub all purpose for the bread flour, but bread flour will help create that beautiful rise.
Wherever you’re at in your sourdough journey, I hope you found this post helpful. I always love reading about other methods and trying something new.
If you try this recipe and love it, please leave a comment below and share. Thanks for reading!