Deep Submersible Well Pump Installation – Our DIY Project
In this post, we will cover the ins and outs of our DIY deep submersible well pump installation project. We’ll talk about why we chose to do it ourselves, what parts we needed help with, and all the details on how we installed the pump ourselves.
We’ll be the first to admit – installing a submersible pump hundreds of feet in the ground (with no prior experience) sounds daunting. And we were hesitant to take this on ourselves. But after hours of research and talking with professionals, we decided that this was a project we could take on ourselves, and turns out, it wasn’t all that bad! It was actually a pretty straightforward process once we had all the materials and a game plan.
In this post, we will break down our reasoning and thought process behind this project, as well as all the details and specs of our well and the process for installing the pump and equipment. When we were researching submersible well pump installation, we didn’t find many accounts of property owners doing this themselves. So if you’re thinking about taking on a DIY well pump installation, we hope you’ll find this post interesting and maybe even inspiring!
However, as a disclaimer – this post is just an account of our personal experience with submersible water well pump installation. We are in no way experts in this field and we are not presenting advice here. If you are seeking information specific to your own water well, please consult a professional.
Now, on to the good stuff! Here are the topics we are going to cover in this post:
- Details About Our Water Well
- Why We Chose to Install the Submersible Well Pump Ourselves
- Materials for the Submersible Well Pump Installation
- Setup for the Submersible Well Pump Installation
- Process for the Submersible Well Pump Installation
- Finishing the Submersible Well Pump Installation
Details About Our Water Well
Our well is 320 feet deep, cased in 4 inch PVC. The PVC is perforated from 260 feet to 300 feet. Based on this, it was recommended that the pump be set between 260 feet and 280 feet. We chose to set the pump at 280 feet.
At the time of drilling, the well yielded around 40 gallons per minute. It was recommended that the pump be between 1 and 1 1/2 horsepower, 230 volt, 10-15 gallons per minute. We will get to the pump we chose down in the materials section of this post.
The static water level of the well was estimated at around 125 feet. Static water level is an important factor in determining your pump size, along with total depth of the well and how high above the well you will need to pump the water. For more information on factors determining pump size and how to calculate it, check out this article.
Why We Chose to Install the Submersible Well Pump Ourselves
We did not plan on installing the well pump by ourselves originally – we actually planned to hire it out. However, there were a few reasons why we ended up deciding to do it ourselves.
The biggest factor in this decision was that we couldn’t find any professional in our area that could do it for a reasonable price. The well pump contractor that we trusted most was out with a major surgery. We had gotten a couple quotes from other contractors and the quotes were outrageous.
The second factor was that the contractor we would have hired (had it not been for the surgery) told us he could help us with basically everything except the actual installation. He could advise us on the materials we needed, give us basic guidelines for installation, and even order all the parts for us. This gave us more confidence that with his knowledge, we could do it ourselves.
The third and final factor in this decision was the benefit of knowing, first-hand, how the pump and equipment was installed. When you do something yourself, you gain knowledge and experience you didn’t have before. If (and when) we have an issue or the well pump needs to be replaced, we will know how to do it, instead of having to hire it out.
This post contains affiliate links. As an Amazon Associate I earn from qualifying purchases.
Materials for the Submersible Well Pump Installation
We have learned, through our research and by talking with many different contractors, that everyone has a slightly different way of doing things when it comes to installing water well equipment. It is definitely a case-by-case basis as far as specific materials and process. We will go into detail below on what we used, but please consult a professional in your area for advice on well equipment and installation specifics.
Well Pump: we chose a Franklin 10GPM stainless steel pump
Pipe: we used 20ft sections of schedule 120 PVC threaded pipe.
Torque Arrestor: we used a torque arrestor above the pump.
Centralizers: we used four inch plastic centralizers every 20 feet.
Rope: we used 1/4 inch twisted polypropylene rope.
Wire: we used 3 wire with ground heavy duty flat jacketed submersible pump cable. This is electrical wire specifically designed for submersible well pumps.
Check Valve: we installed two check valves; one directly above the pump and the other at 140 feet depth.
Couplers: we used 1 inch stainless steel couplers between each joint of PVC.
Pipe Clamp: the model we used is called Kwik Klamp 1. You should be able to find it online at a well or drilling supply store.
Pipe Thread Sealant: we used Blue Monster pipe thread sealant
Thread Seal Tape: we used Blue Monster thread seal tape
Tape: we used 20 mil black pipe wrap tape
Setup for the Submersible Well Pump Installation
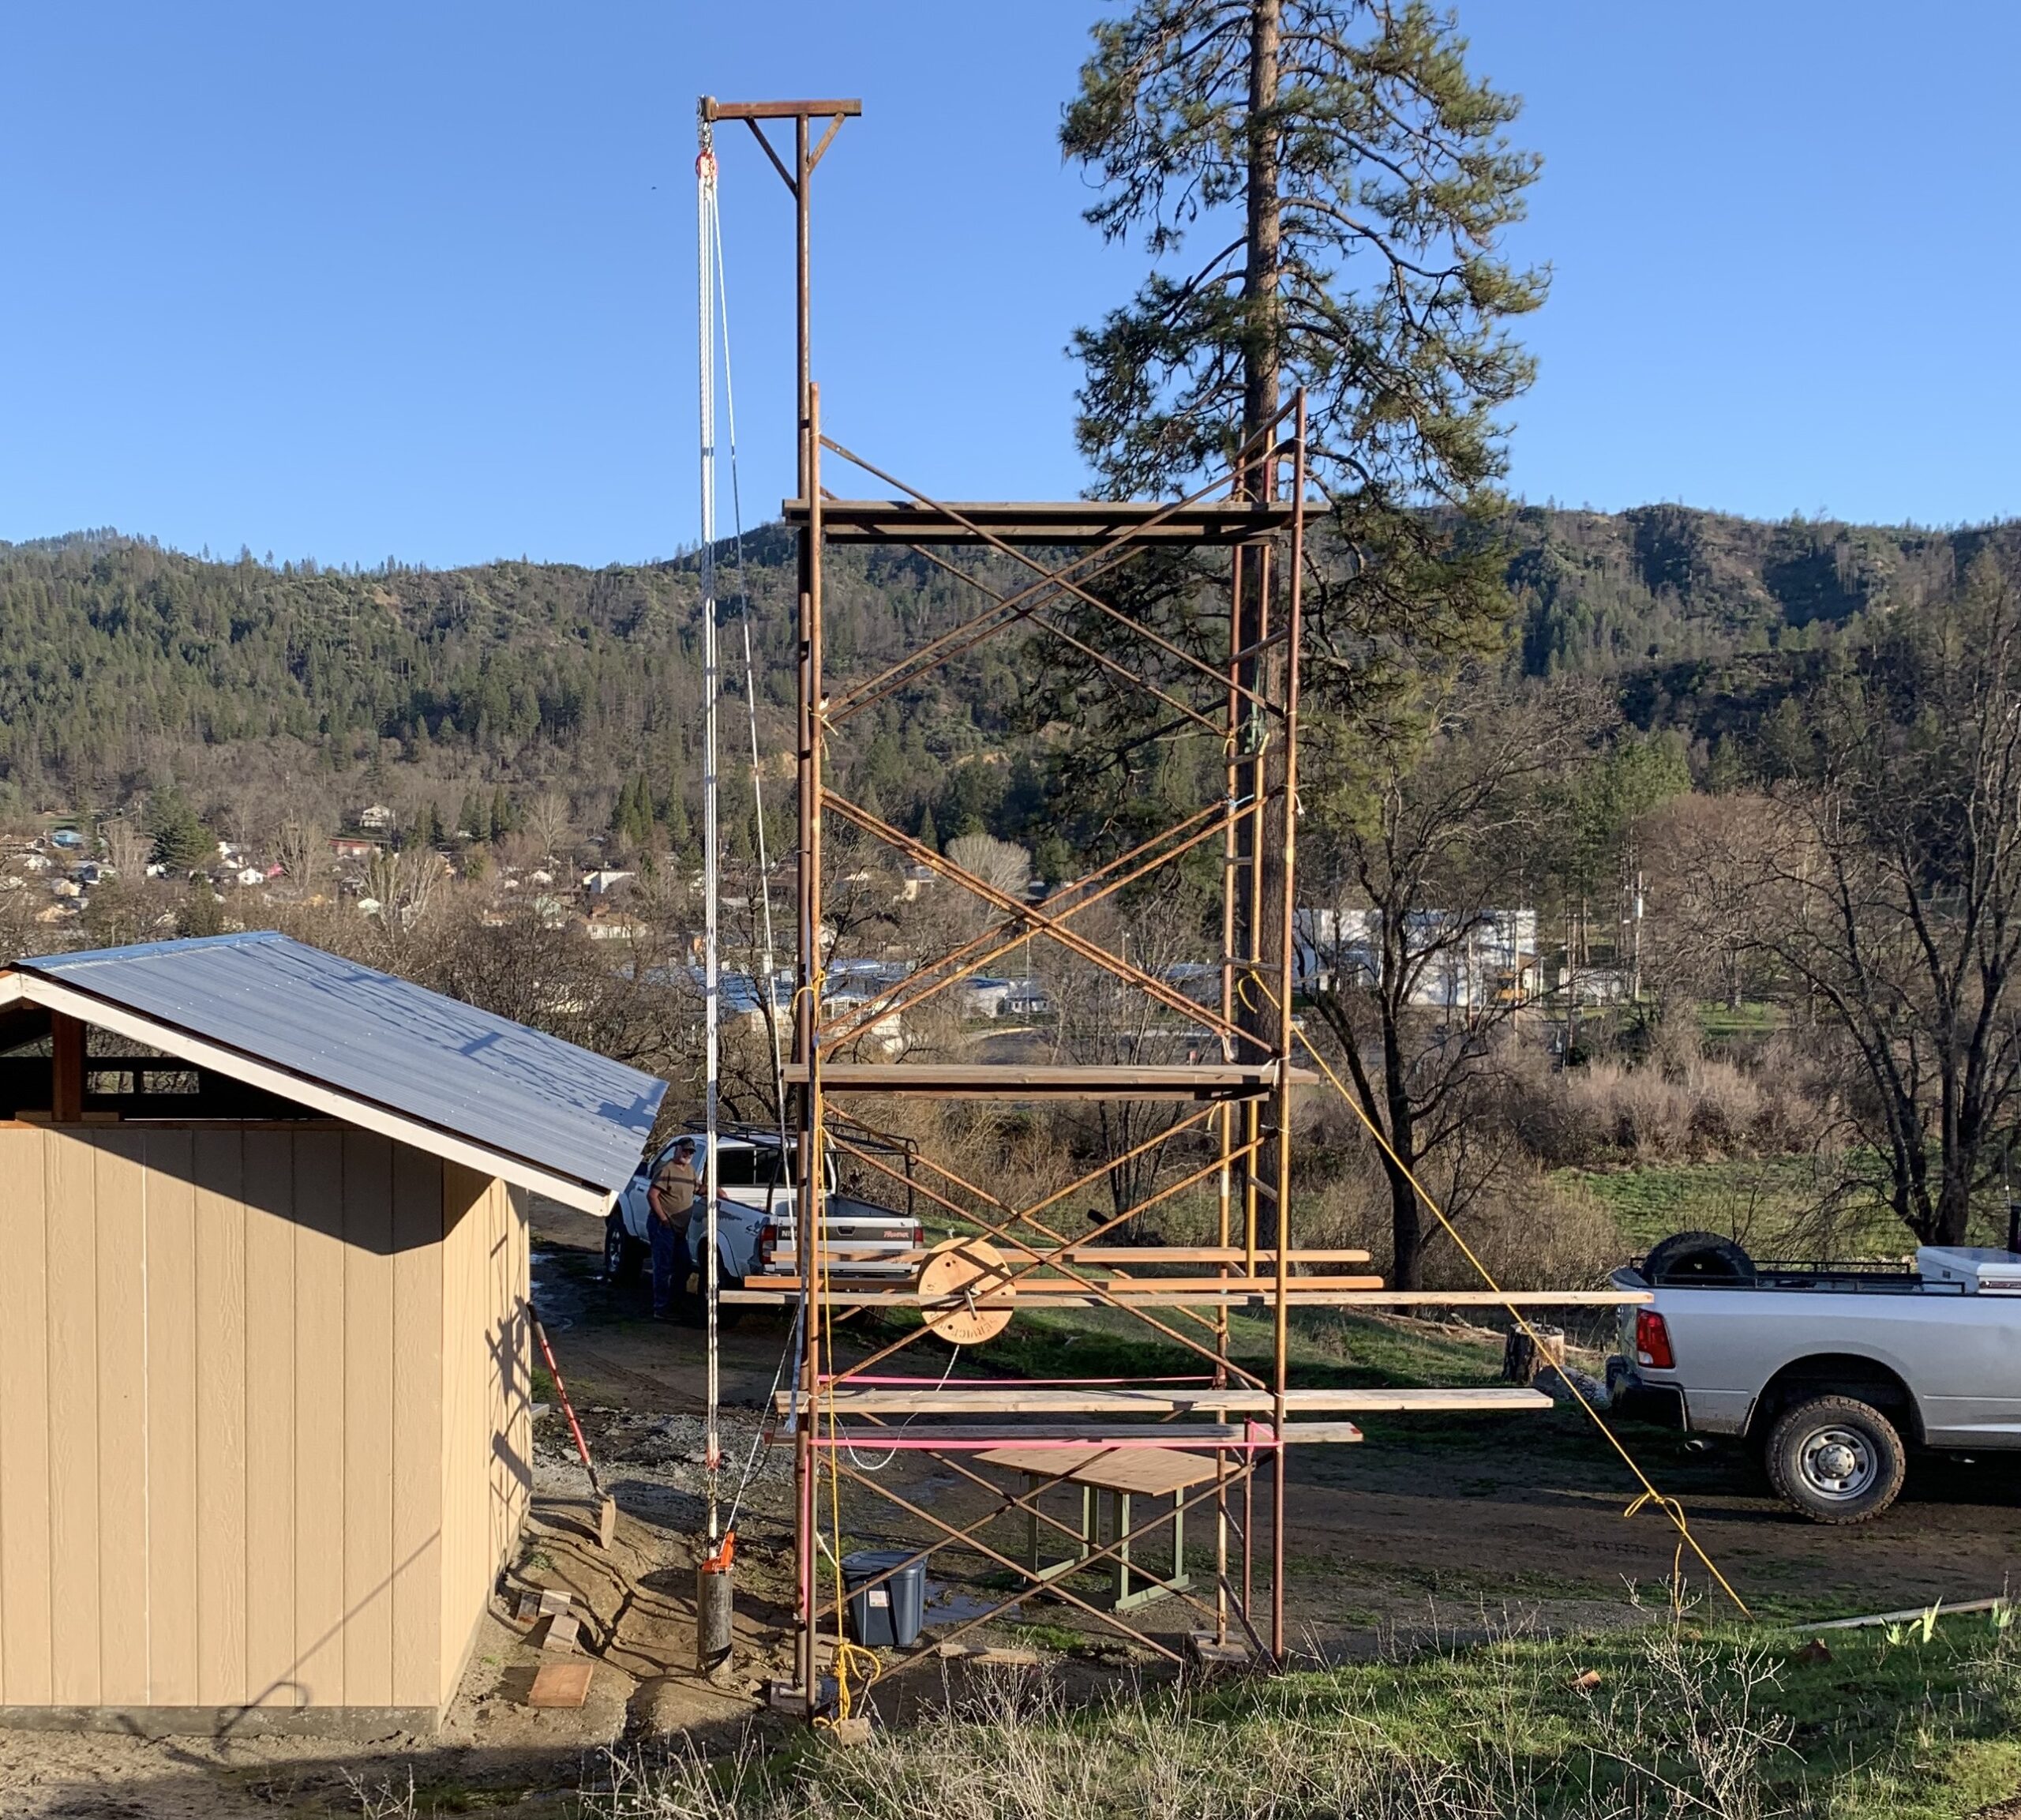
If you’re familiar with how well pumps are usually installed, you might be wondering how we got fourteen 20 foot sections of rigid pipe in the ground. Generally, a well pump contractor has a boom mounted to their truck that can lift the pipe straight up in the air and lower it into the well.
We didn’t have a boom truck available, so we had to get creative. We used four layers of scaffolding to reach about 20 feet in the air, then mounted a 25-foot homemade contraption to the scaffolding using four U-bolts. Using a 7,000 pound block and tackle and a strong braided rope, we were able to hoist each section of PVC up above the well head and lower it into the hole.

This system worked well for us, but did require several helping hands to keep everything running smoothly. We had two of us working on the installation, one person holding the hoist rope and another person holding the safety rope.
Process for the Submersible Well Pump Installation
The most time consuming (and most important) part of this job was wiring and attaching the pump to the first section of PVC. Something that we did not account for in our initial setup of the scaffolding and block & tackle was the height of the pump itself. We needed a few extra feet of space to be able to attach the pump to the first section of PVC. This problem was solved with a temporary hole dug about a foot deep next to our well head.

Not ideal, but when you’re attempting something you’ve never done before, things come up you hadn’t thought of. Quick problem solving (even if the solution seems silly) can save the day! I’m sure we’ll look back on this and laugh.
After that little hiccup, we got the pump wired and attached to the first section of PVC. We attached the polypro safety rope to the pump, and installed the torque arrestor right above the pump.
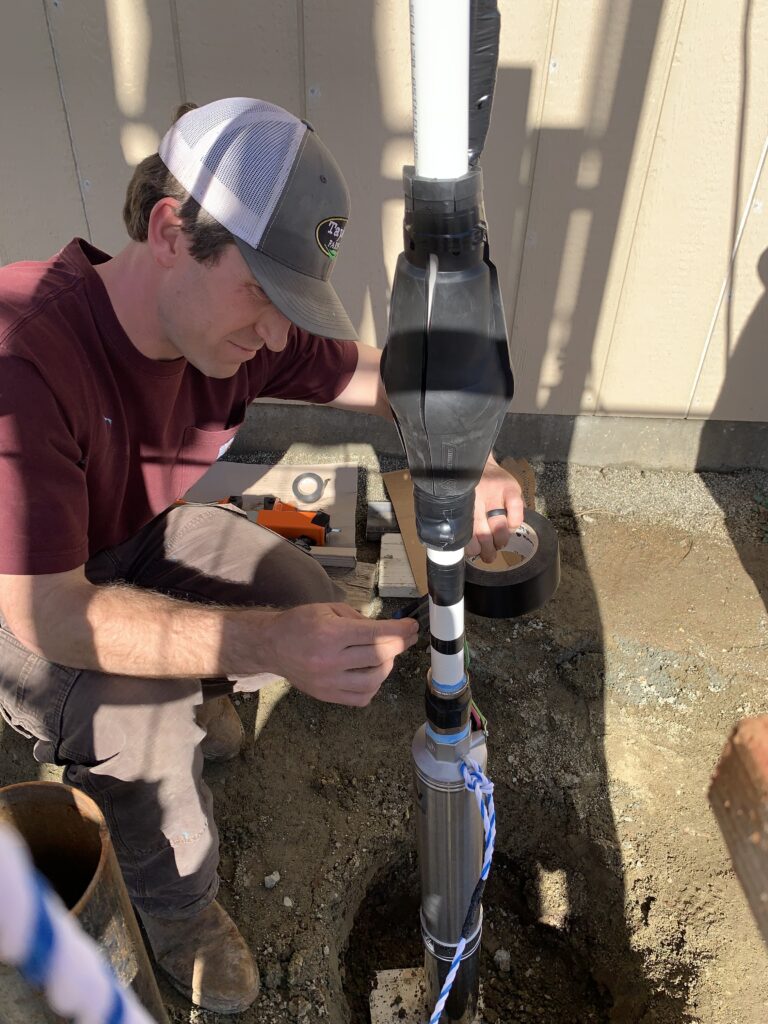
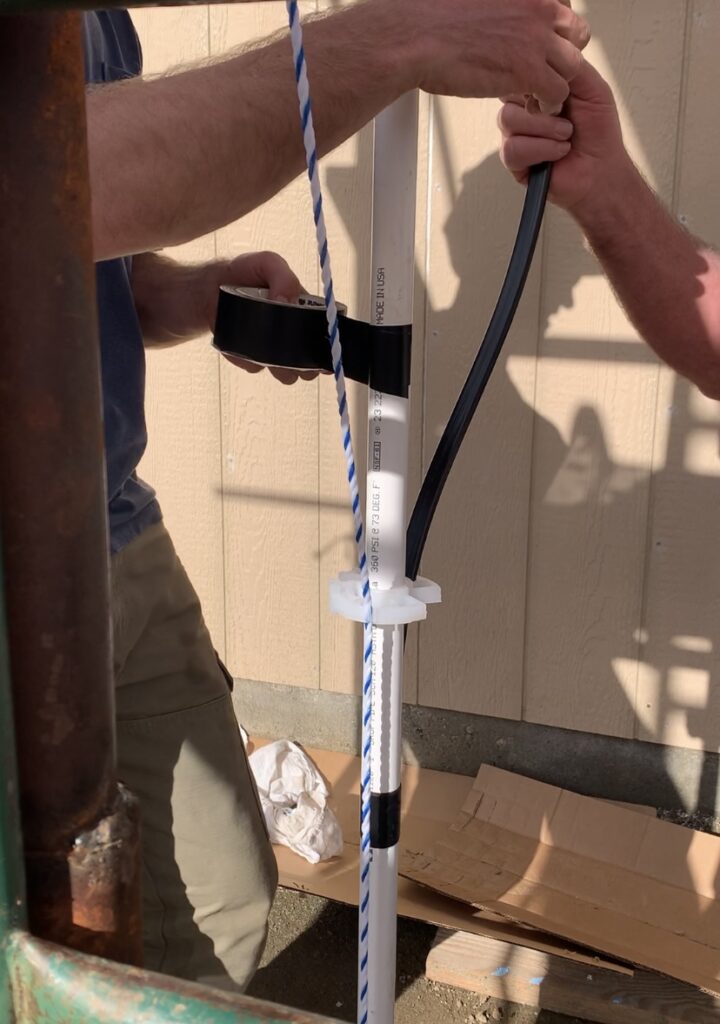
We taped the safety rope and wire to the pipe, then lowered the pump into the well. We used the Kwik Klamp pipe clamp mounted on the well head to hold the installed pipe in place while attaching the next section of PVC.
From there the process was pretty straightforward and we got into a rhythm. Here’s a quick overview of the steps involved:
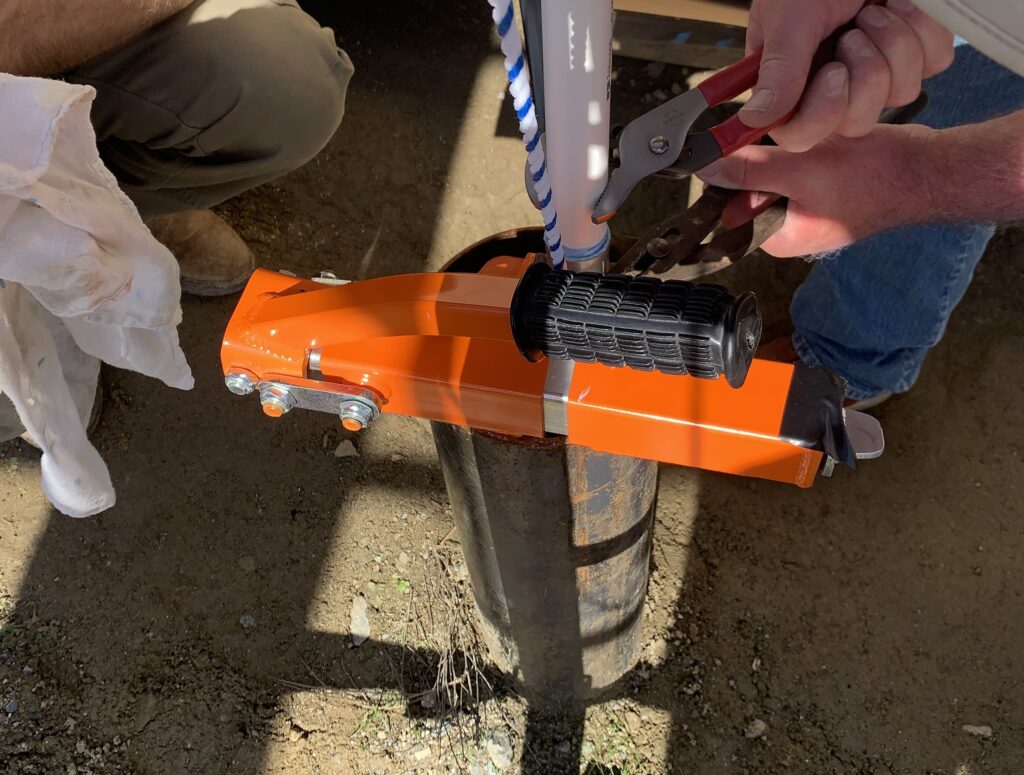
- Secure the installed pipe using the Kwik Klamp.
- Detach the block and tackle and reattach to the new section of pipe; hoist the new section of pipe up in the air above the well head
- Secure new pipe to installed pipe using stainless steel coupler, pipe thread sealant and thread seal tape.
- Lower new pipe into the well, taping the wire to the pipe using 20 mil tape about every four feet.
- Install centralizer in the middle of the section, taping the wire to the pipe on each side of the centralizer.
- Repeat
Finishing the Submersible Well Pump Installation
It might seem obvious, but worth mentioning: the deeper the equipment goes into the well, the heavier it gets. Toward the end of this process, we wrapped both the pulley rope and the safety rope once around our scaffolding. This helped relieve some of the weight that our helpers were holding.
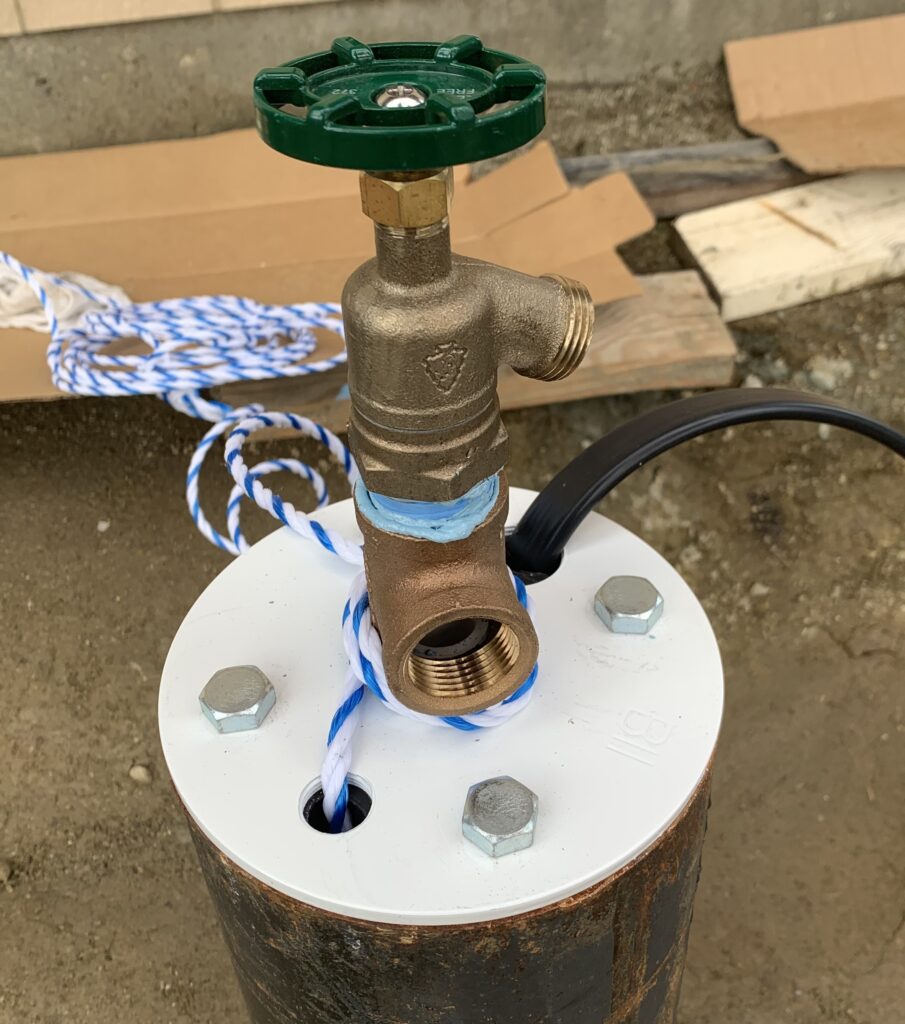
Once we got to the last section of pipe (hooray!), we attached the well cap and spigot on the end of the pipe, then lifted that end up using the block and tackle so the well would be capped as the last section of pipe was installed.
As we lowered the last section of PVC into the well, we ran the safety rope and wire through the well head. The rope was tied off, and the wire would continue into the pump house to the electrical connection.

We were relieved to have this project over with and ready to move on to our next step in property development – getting electricity to the property! That is in the works currently, and we will post an update soon.
Whether you are planning on installing your own well pump, or just doing some preliminary research, we hope you found this post helpful and encouraging. If you have any questions, please leave a comment below. And don’t forget to share this post! Thanks for reading.